
4.4 Example: Vector Addition
Let’s examine a relatively straightforward example that enables us to visualize the CUDA programming model and how to think when we have many cores. In linear algebra, vector addition is well-used operation, where vectors can be represented by arrays of values.
Figure 4-7 shows how vector addition on a GPU device works for the code you will see below (we show a small number of elements, but the real code will use much larger arrays). It also shows how we should think about how we will complete the work in parallel, by having each thread perform a single addition operation and compute a single new value for the result array. The green lines represent each thread of computation running simultaneously in parallel.
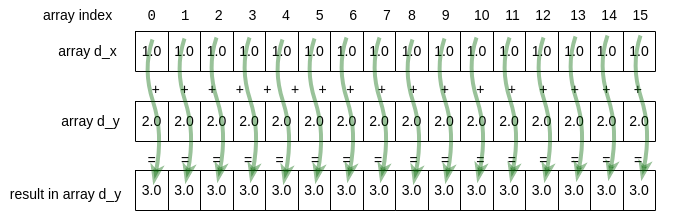
Figure 4-7: Each thread working on 1 array element
Using the CUDA programming model, we can think of having as many threads as we need to complete this type of task on larger arrays than depicted here- the system takes care of doing as much as possible in parallel with the available cores on your card, using the number of blocks you have set up in the grid, then reassigns them to do the rest; we don’t need to worry about that.
In this and the next two sections we will examine 3 versions of how we can complete this code.
First let’s describe in words what the first version of the CUDA code needs to do. Here are the steps, which match comments placed in the code found below.
Allocate 2 arrays, x and y, each with length N, on the host and initialize them with data.
Allocate 2 arrays d_x, and d_y, each with length N, on the GPU device.
Copy each of the arrays from the host to the device.
Determine number of blocks per grid needed, then perform the addition on the device using a kernel function, keeping result in d_y.
Ensure that the device is finished with the computation.
Copy the resulting array d_y from the device to the host, back into array y.
Check that the computation ran correctly.
Free memory on the device and the host.
Three new indispensable additions to the code
Here are three elements of any good CUDA program that are in this example (the full code is below for you to run later).
1. Error Checking. In a previous section (4.2 near the end), we mentioned that it is useful to check for errors that could be introduced into the code. This is true for both CUDA library calls used in the host code or functions you write for the device. CUDA provides some ways to enable you to examine errors that have occurred so that you can debug them. Here is a new macro that does this:
#define cudaCheckErrors(msg) \
    do { \
        cudaError_t __err = cudaGetLastError(); \
        if (__err != cudaSuccess) { \
            fprintf(stderr, "Fatal error: %s (%s at %s:%d)\n", \
                msg, cudaGetErrorString(__err), \
                __FILE__, __LINE__); \
            fprintf(stderr, "*** FAILED - ABORTING\n"); \
            exit(1); \
        } \
    } while (0)
It is used several times in the main function to check for problems with code on the device and report information about them. Here is one example, where we check if the allocation of device memory worked:
  cudaMalloc(&d_y, bytes);
  cudaCheckErrors("allocate device memory");
As we work through each major step of the program, note how we use this to check for errors.
2. Command line arguments and determining the number of blocks per grid. It is always useful to be able to experiment with your application by changing sizes of various attributes to observe what happens. In C we can do this with command line arguments. In the case of this code, we have introduced a function called getArguments() that helps us allow the user to change a parameter. We will see this in later examples also. In this case, the block size (number of threads per block) can be changed in this function by passing a pointer to the variable:
// simple argument gather for this simple example program
void getArguments(int argc, char **argv, int *blockSize) {

  if (argc == 2) {
    *blockSize = atoi(argv[1]);
  }
Back in the main function, we use this by setting a default value, getting a new value if it was on the command line, then calculating the number of blocks needed in a grid, based on the size of the vectors (N).
  // 4.1 Default number of threads in each thread block
  int blockSize = 256;
  getArguments(argc, argv, &blockSize); //update blocksize from cmd line

  // Number of thread blocks in grid needs to be based on array size
  // and block size
  int gridSize = (int)ceil((float)N/blockSize);
Since in most code we may want to vary the size of our arrays, this illustrates the best practice for ensuring that is possible. Given a particular block size and number of elements, we can decide how many thread blocks should be in the 1D grid that will work on each data element.
Let’s test to see if you are following this important part of the code.
- 8
- The threads per block (blockSize in the code, blockDim.x in the picture) is 8.
- 4
- Use the last line of code above. Or: what is GridDim.x in the picture?
- 2
- Yes! The array size divided by the number of threads per block (blockSize) gives us the number of blocks per grid (gridSize in the code, gridDim.x in the picture)
4.4-1: What is the grid size?
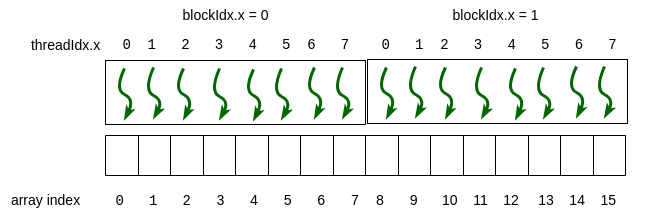
Recall the above example mapping of threads to array elements from the previous chapter. N, the size of each array we will be adding, would be 16. If we choose 8 on the command line for the blockSize, what is the gridSize?
3. Verify Correctness. When developing our code, we also need to develop mechanisms to ensure that the computation is correct. In this case, since we are testing by knowing we have placed 1.0 in each element of the array x (and copied to d_x) and 2.0 into the array y (and copied into d_y), we can test to be certain that every element in the result contains the value 3.0. This is shown in the function called verifyCorrect() in the code below.
// check whether the kernel functions worked as expected
void verifyCorrect(float *y, int N) {
  // Check for errors (all values should be 3.0f)
  float maxError = 0.0f;
  for (int i = 0; i < N; i++)
    maxError = fmaxf(maxError, fabs(y[i]-3.0f));
  std::cout << "Max error: " << maxError << std::endl;
Test your understanding so far
-
4.4-2: Match the elements that are the same for this 1D array example by dragging the one on the left onto its matching partner on the right.
The 'blockDim.x' dimension is for number of threads in the x direction of a block in a grid.
- blockDim.x
- blockSize variable in the code
- gridDim.x
- gridSize variable in the code
- blockDim.y
- 1
blockDim.x
-
The x dimension for threads in a block is used in 1D array mapping.
blockDim.y
-
The y dimension is always 1 in 1D array mapping.
blockDim.z
-
The z dimension is always 1 in 1D array mapping.
gridDim.x
-
The x dimension for blocks in a grid is used in 1D array mapping.
gridDim.y
-
The y dimension is always 1 in 1D array mapping.
gridDim.z
-
The z dimension is always 1 in 1D array mapping.
4.4-3: Which dimensions are relevant for 1D array mapping?
Which of the dimension values that you can get from CUDA are greater than 1 when the length of the 1D arrays in this example are greater than one and the default blockSize of 256 is used? (choose all that are correct)
The steps of vector addition
Let’s look at each step of the algorithm by revealing code blocks.
Allocate 2 arrays, x and y, each with length N, on the host and initialize them with data.
  // host vectors, which are arrays of length N
  float *x, *y;

  // Size, in bytes, of each vector
  size_t bytes = N*sizeof(float);

  // 1.1 Allocate memory for each vector on host
  x = (float*)malloc(bytes);
  y = (float*)malloc(bytes);
Allocate 2 arrays d_x, and d_y, each with length N, on the GPU device.
   // device array storage
  float *d_x;
  float *d_y;

  printf("allocate vectors and copy to device\n");

  // 2. Allocate memory for each vector on GPU device
  cudaMalloc(&d_x, bytes);
  cudaMalloc(&d_y, bytes);
  cudaCheckErrors("allocate device memory");
Copy each of the arrays from the host to the device.
  // 3. Copy host vectors to device
  cudaMemcpy( d_x, x, bytes, cudaMemcpyHostToDevice);
  cudaMemcpy( d_y, y, bytes, cudaMemcpyHostToDevice);
  cudaCheckErrors("mem copy to device");
Determine number of blocks per grid needed, then perform the addition on the device using a kernel function, keeping result in d_y.
  // 4.1 Default number of threads in each thread block
  int blockSize = 256;
  getArguments(argc, argv, &blockSize); //update blocksize from cmd line

  // Number of thread blocks in grid needs to be based on array size
  // and block size
  int gridSize = (int)ceil((float)N/blockSize);

  printf("add vectors on device using grid with ");
  printf("%d blocks of %d threads each.\n", gridSize, blockSize);

  // 4.2 Execute the kernel
  vecAdd<<<gridSize, blockSize>>>(d_x, d_y, N);
Note how this code is designed to use a default block size of 256 threads and let you change it as the single command line argument. Block sizes of 128, 256, or 512 are typical for many NVIDIA architectures (we will examine how this may change performance later). This is because most of today’s NVIDIA cards have 128 cores per streaming multiprocessor (SM). We leave it as an exercise for you to try different block sizes.
Since in most code we may want to vary the size of our arrays, this illustrates the best practice for ensuring that is possible. Given a particular block size and number of elements, we can decide how many thread blocks should be in the 1D grid that will work on each data element.
Ensure that the device is finished with the computation.
  // 5. Ensure that device is finished
  cudaDeviceSynchronize();
Copy the resulting array d_y from the device to the host, back into array y.
  // 6. Copy array back to host (use original y for this)
  // Note that essentially the device gets synchronized
  // before this is performed.
  cudaMemcpy( y, d_y, bytes, cudaMemcpyDeviceToHost);
Check that the computation ran correctly.
  // 7. Check that the computation ran correctly
  verifyCorrect(y, N);
Free memory on the device and the host.
  // 8.1 Free device memory
  cudaFree(d_x);
  cudaFree(d_y);
  cudaCheckErrors("free cuda memory");

  // 8.2 Release host memory
  free(x);
  free(y);
The complete code to run is below after one more important point.
Obtaining an array index for a thread
In the previous section, we provided this function to compute a unique value, beginning with 0, to use as an index into any array. It looks like this:
// Given a 1 dimensional grid of blocks of threads,
// determine my thread number.
// This is run on the GPU on each thread.
__device__ int find1DThreadNumber() {
  // illustrative variable names
  int threadsPerBlock_horizontal = blockDim.x;
  int gridBlockNumber = blockIdx.x;

  int threadNumber;
  threadnumber = (gridBlockNumber * threadsPerBlock_horizontal) + threadIdx.x;
  return threadNumber;
In the vectorAdd program, we use this same concept in the vecAdd kernel function now shown here:
__global__ void vecAdd(float *x, float *y, int n)
{
    // Get our global thread ID designed to be an array index
    int id = (blockIdx.x * blockDim.x) + threadIdx.x;

    // Make sure we do not go out of bounds;
    // Threads allocated could be larger than array length
    if (id < n)
        y[id] = x[id] + y[id];
}
Convince yourself these are both obtaining indexes for arrays and that in the case of the vecAdd function each thread is now completing one addition operation and populating one element of the array.
Note
An important check is being done in the above vecAdd function. We should always check that a thread id to be used as an index into an array does not point outside of the bounds of the array before we attempt the computation.
512
-
The blockIdx.x is not multiplied by the threadIdx.x
2
-
The threadIdx.x is added to the blockSize times the blockIdx.x
258
-
Yes! The threadIdx.x is added to the blockSize times the blockIdx.x
4.4-4: Calculate the array index for a thread using the vacAdd function
If the blockSize used is 256, and for a particular thread blockIdx.x = 1 and threadIdx.x = 2, what is the array index, id, that the thread will work on?
Run it here
This code is designed to use a default block size of 256 threads and let you change it as the single command line argument. Do this by changing the ‘256’ in the command line arguments line above. Try ‘128’ or ‘512’ (yes, use the quotes).
Recall: Block sizes of 128, 256, or 512 are typical for many NVIDIA architectures (we will examine how this may change performance later). This is because most of today’s NVIDIA cards have 128 cores per streaming multiprocessor (SM).
Build and run on your machine
You can use the make command on your own machine or compile the code like this:
nvcc -arch=native -o vectorAdd vectorAdd.cu
Remember that you will need to use a different -arch flag if native does not work for you. (See note at end of section 4.1.)
You can execute this code like this:
./vectorAdd
Vector addition by managing memory ourselves.
size (N) of 1D arrays are: 33554432

allocate vectors and copy to device
add vectors on device using grid with 131072 blocks of 256 threads each.
Max error: 0
execution complete
Note that you can use a different blockSize like this:
./vectorAdd 128
Exercises
4.4-1. To be certain that the code is still correct, try using different block sizes of 128 and 512 by changing the command line argument.
4.4-2. If you are ambitious, you could try changing the command line arguments (if you are familiar with this) to include a length for the arrays. Or more simply, change the code to change the size of the array, N, as shown early in the main function. This is useful to verify the code is still correct. Later we will see that it is useful for trying different problem sizes to see how the code performs.